Step 5: Chart of account imports & mapping
Once you’ve set up your workspace and labeled your transactions, the next step is to connect Cryptio to your accounting software (ERP) and map your transactions to the correct accounts.
Your mappings are based on two components:
Asset mappings – link each imported wallet source to the correct Balance Sheet accounts.
Label mappings – link your Revenue and Expense labels to the Profit and Loss Statement.
Step 1: Create a Chart of Accounts in Your ERP
Before importing your Chart of Accounts (COA) into Cryptio, review your ERP setup. We recommend ensuring that you have:
A dedicated Realized Gain account (and Unrealized Gain if you use Fair Market Valuation revaluations).
A dedicated Realized Loss account (and Unrealized Loss if applicable).
A Fee Expense account.
Separate asset accounts for your top 5–10 most important tokens (e.g., BTC Asset Account, ETH Asset Account).
An “Other Digital Assets” account for all remaining tokens.
Dedicated accounts for each of your Revenue and Expense labels, which makes mapping simpler.
Step 2: Import Your COA From Your ERP
Next, connect your ERP to Cryptio to pull in your Chart of Accounts:
Go to ACCOUNTING → ERP Integrations.
Choose your software (QuickBooks, Xero, or NetSuite).
For QuickBooks or Xero: click Connect, log in, and your COA will be imported automatically.
For NetSuite: follow this step-by-step guide.
If your ERP is not listed, select Custom to upload a CSV file. Use this template to format your COA.
Whenever you update your COA in your ERP, click Update in Cryptio to refresh your imported accounts.
Once imported, head to ACCOUNTING → Chart of Accounts → View Imported COA. Here you can toggle off irrelevant accounts so they don’t appear as mapping options.
Step 3: Mapping Your Default Accounts
Set up your default mapping to define how Cryptio handles common transaction types:
In Chart of Accounts, go to the Default Mapping tab.
Under Transaction Fee, choose an expense account for all fees.
Under Realized Gains and Losses, decide whether to use the same or separate accounts.
Select the account(s) where gains and losses should be booked.
Your default mapping is now ready.
Restricted Mapping Mode: By default, Cryptio only shows relevant accounts when mapping. For example, when mapping assets, only asset accounts appear (not revenue or expense accounts). This is to help make sure you’re debiting and crediting accounts correctly. However, if you need unrestricted mapping for your specific use case, contact Customer Support.
Step 4: Asset Mapping
Asset mapping assigns wallet and exchange sources to the correct asset accounts:
In the Source Mapping tab, click + Add Mapping.
Choose to map by individual source, source cluster, or sources with similar names.
You can also map all wallets or all exchanges at once, if appropriate.
Under Mapping Account, select a default account for all other assets (e.g., “Other Digital Assets”).
Optionally, choose a separate expense account for fees.
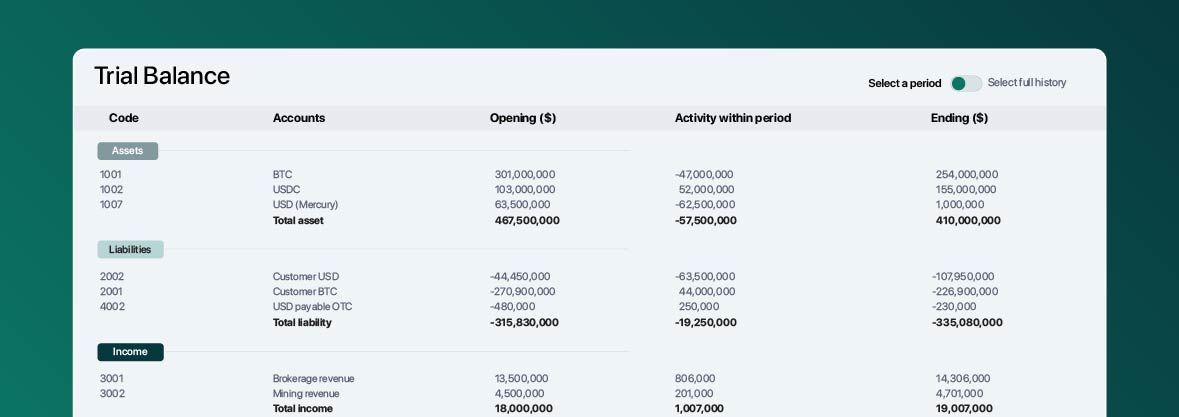
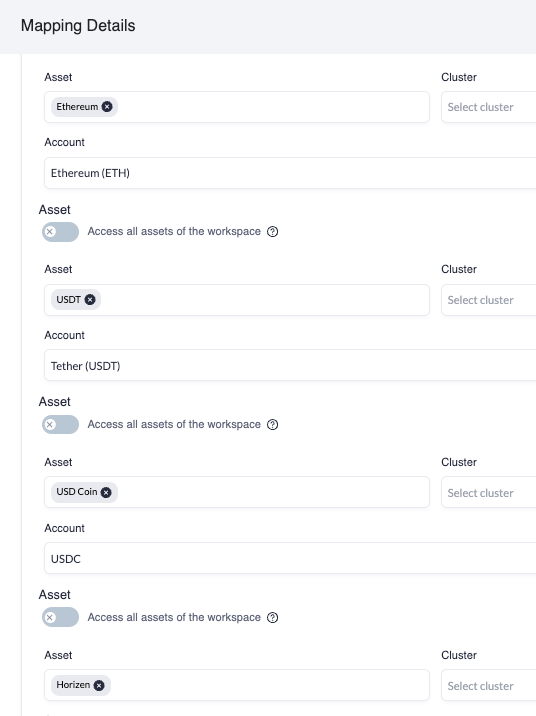
Under Asset Mapping, set up dedicated accounts for your key tokens:
Select the asset (e.g., ETH, BTC).
Assign the correct COA account.
Repeat for each main token.
Click Create Mapping to save.
Repeat for all relevant sources.
Step 5: Label Mapping
Label mapping ensures your revenue and expense labels are linked to the right accounts:
Go to the Label Mapping tab and click + Add Mapping.
Enter the Label Name and select the correct account.
Click Create Mapping to save.
Repeat until all revenue and expense labels are mapped.
When finished, click Apply Mappings. Your transactions will automatically update with the correct Debited and Credited accounts. You can check this on the Transactions page by opening the transaction details panel.
FAQs
Q: What about internal transfers?
An internal transfer is when a crypto asset (with its original cost basis) moves between two wallets imported into your workspace. These are non-taxable and automatically labeled as Internal Transfer if:
Both wallets are imported into Cryptio.
Volumes match exactly.
Assets match (e.g., USDC → USDC).
The out transaction happens before the in transaction.
Both occur within 6 hours.
Do not create your own version of the Internal Transfer label—it will not carry over the cost basis. If your transfer doesn’t meet the rules above, contact Customer Support.
Q: What if I have transactions that should not follow automated mapping?
You can manually assign accounts to a transaction:
Open the transaction details panel.
Tick Manual chart of accounts mapping.
Choose the Debit and Credit accounts.
Click Save.
Use this sparingly, as it is manual and error-prone.
Q: What if I can’t find my account?
This usually happens because of restricted workspace settings. By default, Cryptio only shows accounts relevant to the type of mapping you’re doing (for example, only asset accounts when mapping assets).
Here’s how to troubleshoot:
Check if the account is imported
Go to Chart of Accounts → View Imported COA.
Use the search bar to look up the account by code or name.
If the account is imported but doesn’t appear in mappings
Your workspace restrictions may be hiding it.
Contact Customer Support to request that your mappings be unrestricted.
If the account is not imported but exists in your ERP
Go to ACCOUNTING → ERP Integrations.
Find your ERP and click Update Chart of Accounts.
Return to View Imported COA and confirm that the account now appears.
Q: What about spam or scam tokens?
Cryptio’s Spam Cleaner removes most spam assets automatically. If some slip through, visit the Asset Management page to manually flag and manage them.
Once mapping is complete, the next step is to review your transactions, fix any errors, and start pushing them to your accounting software.